
Key Takeaways
- Definition: The Baro sensor measures atmospheric pressure to help the ECU adjust the air-fuel mixture, especially important during altitude changes.
- Core Symptoms: Black smoke from the exhaust, poor engine performance, decreased fuel economy, and a "Check Engine" light (e.g., P0106).
- Normal Readings: At sea level, a Baro sensor should read approximately 14.7 psi (101 kPa) or 29.92 inHg.
- Expert Diagnostic: Use an OBD2 scanner to compare Baro sensor live data with local weather station pressure for 100% accuracy.
What Is a BARO Sensor?
The BARO sensor (Barometric Pressure Sensor) is a critical engine management component that measures ambient atmospheric pressure. It sends real-time pressure data to the ECU to support stable combustion and performance across changing environments.
This sensor operates independently of engine load, focusing exclusively on environmental pressure changes. Unlike intake-related sensors, its readings reflect only external factors like altitude, weather systems, and elevation shifts.
Key facts about BARO sensors:
- Measures ambient atmospheric pressure
- Sends a voltage signal to the ECU
- Helps adjust fuel injection and ignition timing
- Improves engine performance at different altitudes
In most modern vehicles, the BARO function is integrated into the MAP sensor.
Related Reading: P2228 OBD-II Trouble Code: Barometric Pressure Sensor "A" Circuit Low
What Does a Barometric Pressure Sensor Do?
The BARO sensor uses atmospheric pressure data to help the ECU optimize engine behavior in three critical ways:
- Altitude Compensation & Air-Fuel Ratio Calibration: Maintains the ideal air-fuel mixture as oxygen density changes with elevation, preventing rich/lean conditions, power loss, and high emissions.
- Ignition Timing Adjustment: Enables ECU optimization of spark timing based on air density changes, preventing engine knocking (pre-detonation) at high altitudes or under heavy load.
- Turbocharger/Supercharger Regulation (Forced Induction Engines): Serves as the baseline ambient pressure reference for turbo/supercharger-equipped engines, letting the ECU set safe boost limits and prevent damaging over-boosting (especially at low altitudes with higher ambient pressure).
Without valid BARO sensor input, the ECU must rely on pre-programmed default pressure values, leading to suboptimal engine operation, reduced performance, poor fuel economy, and increased emissions.
Where Is the BARO Sensor Located?
The BARO sensor location varies by manufacturer but is typically found in one of three primary configurations.

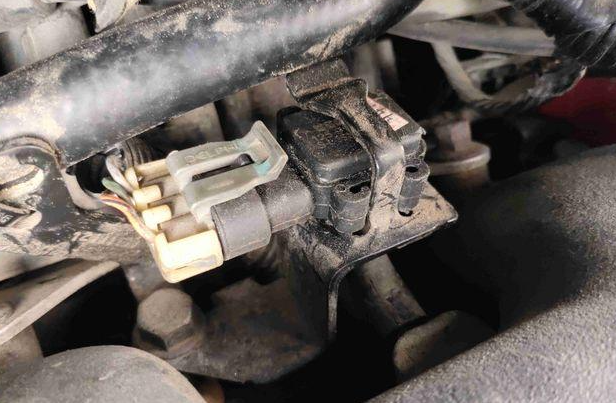
Figure: As described in the 'Integrated' configuration below, here is what a combined MAP/BARO sensor looks like in a real engine bay.
| Configuration | Typical Description | Common Vehicle Examples |
| Integrated in MAP Sensor (Most Common) | The BARO function is a secondary feature of the Manifold Absolute Pressure sensor. | Most modern passenger cars. |
| Inside the ECU | The sensor is soldered directly onto the Engine Control Unit's internal circuit board. | Certain Volkswagen and Audi models. |
| Standalone Sensor | A dedicated sensor mounted independently within the engine bay or near the firewall. |
|
BARO Sensor vs MAP Sensor: What’s the Difference?
BARO and MAP sensors are distinct components that work in tandem, but they measure different pressure sources and serve unique roles. The BARO sensor measures outside ambient pressure while the MAP sensor measures internal engine vacuum.
| Feature | BARO Sensor | MAP Sensor |
|---|---|---|
| Measures | Atmospheric pressure (outside the engine) | Intake manifold pressure (inside the intake manifold) |
| Purpose | Altitude reference | Engine load calculation |
| Location | ECU / engine bay / integrated | Intake manifold |
| Engine state | External air pressure | Internal engine pressure |
| Reading Stability | Stable, changes only with altitude/weather | Fluctuates constantly with throttle input and engine load |
| Integration | Can be standalone or integrated into MAP sensor | Always mounted on the intake manifold |
What Should a BARO Sensor Read?
A healthy BARO sensor must provide readings that accurately reflect the current local atmospheric pressure at the vehicle's location. This pressure varies primarily with elevation and local weather conditions.
At sea level, the normal BARO sensor reading is approximately 14.7 psi (101 kPa) or 29.92 inHg. This baseline decreases predictably with elevation:
- 5,000 ft (1,524 m): ~12.2 psi (84 kPa / 24.9 inHg)
- 10,000 ft (3,048 m): ~10.1 psi (70 kPa / 20.6 inHg)
To verify sensor accuracy:
For diagnostic accuracy, always compare OBD2 scanner BARO readings to real-time data from a local weather station or airport METAR reportt (aviation weather - most accurate and timely). A discrepancy of more than 0.5 psi (3.4 kPa) indicates a potential sensor issue.
Acceptable Tolerance:
A discrepancy greater than 0.5 psi (3.4 kPa or 0.15 inHg) typically indicates a potential sensor or circuit fault warranting further investigation. Smaller variations are usually within normal operational tolerance and reflect real-time atmospheric fluctuations.
Symptoms of a Bad BARO Sensor
- Illuminated Check Engine Light
The most common first sign, often paired with diagnostic trouble codes (DTCs) like P0105 or P0106.
- Sluggish Acceleration
The engine feels underpowered because the fuel-to-air ratio is incorrect for the current altitude, especially at high altitudes.
- Rough Idling
Inconsistent pressure readings lead to unstable combustion, resulting in a shaky or uneven idle.
- Reduced Fuel Economy
The engine consumes more fuel than necessary due to inaccurate atmospheric data.
- Increased Emissions
An overly rich fuel mixture may lead to higher emissions and potentially a failed emissions test.
- Black Exhaust Smoke
A rich fuel mixture caused by faulty BARO data leads to incomplete combustion, producing heavy black smoke from the tailpipe.
Diagnostic Trouble Codes Related to BARO Sensor
Several OBD2 trouble codes indicate problems related to BARO or MAP sensor performance.
Common diagnostic codes include:
- P0105: MAP/BARO Sensor Circuit Malfunction.
- P0106: MAP/BARO Sensor Range or Performance Problem (often caused by "drifting" signals).
- P0107: MAP/BARO Sensor Circuit Low Input (potential short to ground or open circuit).
- P0108: MAP/BARO Sensor Circuit High Input (potential short to power).
Common Causes of BARO Sensor Failure
Most BARO sensor issues stem from environmental contamination or electrical degradation rather than mechanical damage.
- Moisture Intrusion: Water or condensation entering the sensor housing can short out the sensitive internal diaphragm.
- Carbon Buildup: If integrated with the MAP sensor, oil vapors and carbon from the intake can clog the sensing port.
- Vibration Damage: Constant engine vibration can cause internal circuit fractures over time.
- Circuit Corrosion: Exposure to road salt and engine heat can degrade the wiring harness connectors.
Proper diagnosis should always verify wiring and sensor signals before replacing components.
How to Test a BARO Sensor
Testing a BARO sensor involves comparing its reported data against real atmospheric pressure. Follow this simple, step-by-step diagnostic guide:
- Key On, Engine Off Test
Connect an OBD2 scanner and read the BARO value. It should closely match your local weather station’s barometric pressure.
- Compare BARO and MAP Readings
With the engine off, the MAP reading should be nearly equal to the BARO reading. A large difference indicates a sensor issue.
- Visual Inspection
Check the sensor connector for green corrosion, bent pins, loose connections, or frayed wiring.
- Voltage Check
Use a multimeter to confirm the sensor gets 5V reference voltage and a good ground.
- Vacuum Test (If Applicable)
For external sensors, use a vacuum pump. The reading should change smoothly and linearly with pressure.
Recommended Diagnostic Tools for BARO Sensor Troubleshooting
Choosing the right diagnostic tool is essential for accurately comparing real-time atmospheric data with sensor output. Without high-speed live data capabilities, you are simply guessing. Based on the specific diagnostic needs mentioned in this guide, we recommend two professional-grade solutions from Foxwell:
Option 1: Foxwell NT614 Elite – Best for DIYers & General Diagnostics
The Foxwell NT614 Elite is the ideal companion for standard BARO and MAP sensor verification. Live Data Stream: It allows you to pull up BARO and MAP pressure values side-by-side in real-time. This is critical for the "Key On, Engine Off" test to ensure both sensors report identical atmospheric pressure.
- Full System Access: Beyond just engine codes, it scans ABS, SRS, and Transmission, making it a versatile long-term investment for your home garage.
- User-Friendly: Its intuitive interface helps entry-level technicians quickly identify "signal drift" without complex manual calculations.
Option 2: Foxwell NT710 – Best for Advanced Calibration & Specialized Vehicles
The Foxwell NT710 is designed for complex scenarios where a simple code clearing isn't enough. Bi-Directional Control: If your BARO sensor is integrated into the ECU (common in Volkswagen and Audi models), the NT710 can perform active tests to verify the ECU's internal processing.
- Special Functions & Calibration: For modern vehicles that require a "Parameter Reset" or professional calibration after sensor replacement, the NT710 provides the specialized software access usually reserved for dealership tools.
- Brand-Specific Depth: It offers OE-level diagnostic depth, allowing you to dig into the specific adaptations that standard scanners might miss.


How to Fix a BARO Sensor Problem
- Electrical contact cleaner
- Compressed air (optional)
- Wire brush (for corrosion)
- Electrical tape or heat shrink tubing
- OBD2 scanner (for code clearing and verification)
- Basic socket set (for sensor removal)
Step 1: Clean the Sensor (Mild Contamination – First Try!)
- Locate the BARO sensor (integrated with MAP sensor, standalone, or ECU-mounted – if accessible).
- Remove the sensor carefully (disconnect the electrical connector first).
- Spray the pressure port and connector terminals with electrical contact cleaner.
- Use compressed air (low pressure) to blow out debris – avoid poking the internal diaphragm.
- Let it dry completely (5-10 minutes) before reinstalling.
- Verify: Reconnect the OBD2 scanner to check if readings return to normal.
Step 2: Repair Wiring & Connectors (Electrical Faults)
- Inspect the sensor’s wiring harness for fraying, breaks, or rodent damage.
- Check the connector for green corrosion, bent pins, or loose terminals (use a wire brush to clean corrosion).
- Repair damaged wires with electrical tape/heat shrink tubing; replace severely corroded connectors if needed.
- Ensure the connector clicks firmly into place after repair (poor connection mimics sensor failure).
- Verify: Clear DTCs with an OBD2 scanner and test drive to confirm no code recurrence.
Step 3: Replace the BARO Sensor (Sensor Failure)
- For integrated MAP/BARO sensors: Replace the entire MAP sensor unit (BARO function can’t be replaced separately).
- For standalone/ECU-mounted sensors: Purchase a OEM/aftermarket sensor matching your vehicle’s make/model.
- Installation steps:
- Disconnect the vehicle battery (negative terminal) for safety.
- Remove the old sensor (unbolt or release clips; disconnect wiring).
- Install the new sensor (align correctly, don’t over-tighten bolts).
- Reconnect the wiring connector and battery.
- Note: Some vehicles require a genuine OEM sensor to work with the ECU (aftermarket may need calibration).
Step 4: Re-Calibrate & Verify (Post-Repair)
- Connect an OBD2 scanner to clear all existing DTCs.
- Perform a “Key On, Engine Off” test: Confirm BARO readings match local atmospheric pressure.
- Test drive: Drive for 10-15 minutes (include highway and city conditions) to let the ECU re-learn.
- Final check: Scan again with the OBD2 scanner – no new DTCs + stable BARO readings = successful repair.
- Exception: Some luxury/modern vehicles need professional calibration (via dealer or advanced OBD2 tool) for the new sensor to work correctly.
Pro Tips for DIYers
- Always reference your vehicle’s repair manual for sensor location and torque specs (over-tightening breaks sensors).
- If the BARO sensor is integrated into the ECU (rare), skip Steps 1-3 – contact a professional to repair/replace the ECU.
- After replacement, avoid high-altitude driving for 24 hours to let the ECU adapt to the new sensor.
Repair & Replacement Costs (2026 Updated)
The cost to fix a BARO sensor depends on the repair type and whether the sensor is standalone, integrated with the MAP sensor, or built into the ECU.
| Service Type | Average Cost (USD) | Key Notes |
|---|---|---|
| DIY Sensor Cleaning | $0 – $30 |
|
| DIY Sensor Replacement | $50 – $150 |
|
| Professional Wiring Repair | $100 – $250 |
|
| Professional Sensor Replacement | $150 – $350 |
|
| ECU Repair/Replacement (Internal BARO) | $300 – $800+ |
|
Can You Drive With a Bad BARO Sensor?
Yes. You can drive with a failing BARO sensor, but prolonged use will eventually damage other engine components. Running the engine with an incorrect air-fuel mixture can lead to catalytic converter overheating or spark plug fouling, potential risks include: reduced fuel efficiency, poor engine performance, increased emissions and possible catalytic converter damage.
For vehicles driven in mountainous regions, a bad BARO sensor may cause the car to stall or lose significant power during elevation changes.
Repairing the problem early prevents additional engine issues.
FAQs
What happens when a barometric pressure sensor goes bad?
When the sensor fails, the ECU receives incorrect or "out-of-range" atmospheric data, leading to an improper air-fuel mixture. This results in poor combustion, reduced engine power, and potentially increased exhaust emissions.
Is a BARO sensor the same as a MAP sensor?
Not always. Some vehicles combine the BARO function into the MAP sensor, while others use a separate sensor.
Why is my Baro sensor reading performance range low?
A low performance range reading typically stems from electrical faults (corroded wiring, weak voltage), vacuum leaks, or a contaminated/damaged sensor that can no longer produce accurate pressure signals. In some cases, internal sensor "drift" causes the component to report values lower than the actual atmospheric pressure.
Leave a comment
This site is protected by hCaptcha and the hCaptcha Privacy Policy and Terms of Service apply.